ATmega328p does not provide any Digital/Analog conversion channels (although the D/A conversion can be simulated by means of measuring the PWM output). We can easily add up to eight D/A channels using either a LTC1665 (8 bit) or LTC1660 (10 bit) from Linear Technology.
What makes LTC1665/LTC1660 attractive is that the D/A converters addressable via the serial interface. And thus, controlling the eight D/A channels requires relatively few connections with ATmega328p.
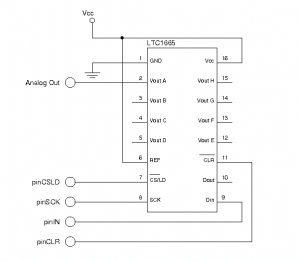
The schematic below illustrates how to utilize a D/A channel with input from ATmega328p. Pin IN, SCK, CSLD, CLR can be connected to any pins that accept digital input. And the pin labeled Analog Out outputs the conversion result.

The output voltage from the function output() is determined by:
\[Vout = \frac{Vref \times val}{256}\]
for LTC1665 (8 bit), and
\[Vout = \frac{Vref \times val}{1024}\]
for LTC1660 (10 bit). In my example above, Vref is connected to Vcc and is typically around 5V.
The following code uses Arduino to drive the DAC clock. To test the conversion result, the analog output is connected with an Arduino analog input pin.
const int pinIN = 8;
const int pinSCK = 7;
const int pinCSLD= 3;
const int pinCLR =12;

const int pinAnalogOut = 5;

void setup()
{
  pinInit();
  Serial.begin(9600);
  output(1, 64);
  Serial.println(analogRead(pinAnalogOut));
}

void pinInit()
{
  pinMode(pinIN, OUTPUT);
  pinMode(pinSCK, OUTPUT);
  pinMode(pinCSLD, OUTPUT);
  pinMode(pinCLR, OUTPUT);

  digitalWrite(pinCLR, HIGH);
  digitalWrite(pinSCK, LOW);
  digitalWrite(pinCSLD, HIGH);
}

//Performs D/A conversion
void output(long chn, long val)
{
  //the control word is 16 bits
  //the high 4 bits defines the output channel
  long t = chn << 12;

  //the lower 4 bits are don't cares so we make
  //them zeros.
  t = t | val << 4;
  //for LTC1660 it has 10bit resolution this line will
  //need to change to:
  //t = t | val << 2;

  digitalWrite(pinCSLD, LOW);
  for (long i = 15; i >= 0; i--)
  {
    long b = (t >> i) & 1;
    digitalWrite(pinIN, b);
    digitalWrite(pinSCK, HIGH);
    digitalWrite(pinSCK, LOW);
  }

  digitalWrite(pinCSLD, HIGH);
}

void loop()
{
}
The bit resolution difference between LTC1665 and LTC1660 is handled by the code within the output() function.
Update
You can also drive LTC1665 using hardware SPI. The code is listed below:
void setDAC(int address, int value)
{
    int h = address << 4 | value >> 4;
    int l = value << 4;
    digitalWrite(CSDAC,LOW);
    SPI.transfer(h);
    SPI.transfer(l);
    digitalWrite(CSDAC,HIGH);
}

