The Arduino development environment is probably the preferred development platform for the majority of Arduino users. It is lean and relatively easy to use. Quite a few examples are at your finger tip and even for people without much programming experience, it is relatively easy to get started. You can write and upload your sketches (programs) without the need to ever leave the IDE.
Despite its convenience, the Arduino IDE lacks some key features most modern IDEs have. To name a few, the Arduino IDE does not yet support auto-completion, code folding and contextual help. And the integrated parser sometimes have difficulties parsing complex code structures and do not give adequate information for the errors encountered. While it does not matter much for writing simple programs, the drawbacks are obvious when developing more complex applications. Since I am a software developer, I personally prefer a more advanced IDE.
If you are using Eclipse, then there is already a plugin available for AVR development, though I have not personally tried it I have seen other people using it regularly. Looking at the Arduino playground instructions for this plugin, it seems that it is pretty straight forward to set up. But if you are using NetBeans, currently there’s no Arduino support yet.
Luckily, it is actually fairly straight forward to add Arduino support in the NetBeans environment. In this article, I will show you step by step instructions on how to prepare your NetBeans environment for Arduino development purpose.
For those who are impatient and know your way around the NetBeans environment, you can download and install ArduinoPlugin_v1.0.tar.gz (Tools -> Plug-ins, under Downloaded tab, choose add plug-ins) and get started right away. You do need to configure your NetBeans environment to support avr-gcc tool chain before you can start using the Arduino module. If you are unsure how to do this, please read on.
Prerequisite
This plugin requires a functional Arduino development environment. Since this plug-in relies on the Arduino core libraries for code compilation, Arduino must be installed first. You can refer to the Getting Started with Arduino guide on the official Arduino site on how to install the Arduino programming environment.
The instructions in this article assumes that you are running Arduino under Linux, but I think you can adapt it to Windows environment with relatively few changes. Here is a list of the software versions I have installed on my PC.
Ubuntu 10.04 (64bit)
avr-gcc 4.3.4
avrdude 5.10
RXTX-2.2pre2
NetBeans 6.8
arduino-0018
Depending on your particular settings (e.g. the installation path of arduino-0018 is not located under your home directory or it is installed under a different directory name), minor modifications to the template might be needed.
Configure AVR Tool Chain
To setup the NetBeans environment, we need to first setup the AVR tool chain. To do so, first launch NetBeans, navigate to Tools -> Options and click “Add” under C/C++/Build Tools (see screen shot below), and from there we can create a new tool chain called Arduino and configure the paths in the right-hand-side pane accordingly. Here is a screenshot of the tool chain configuration on my system:
Base Directory: /usr/bin
C Compiler: /usr/bin/avr-gcc
C++ Compiler: /usr/bin/avr-g++
Assembler: /usr/bin/avr-as
Debugger: /usr/bin/gdb (this is not important since we do not run Arduino applications within NetBeans anyway)
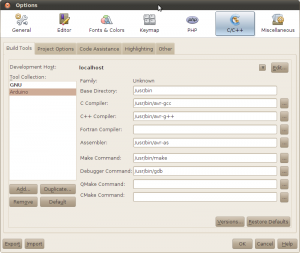
In order for the auto-complete feature to work with the Arduino/AVR header files, we also need to setup the paths under the Code Assistance tab. To begin with, you would need to setup the following paths:
~/arduino-0018/hardware/arduino/cores/arduino (assuming that you installed Arduino 0018 under your home directory)
~/arduion-0018/libraries/
/usr/lib/gcc/avr/4.3.4/include
If you use libraries located in other locations, you will need to add those paths to the C/C++ compiler code assistance tab as well.
Install the Arduino Plugin
To install the plugin, download the NetBeans module first (ArduinoPlugin_v1.0.tar.gz). Use the following command to extract the NetBeans Module (ArduinoPlugin_v1.0.nbm):
tar zxf ArduinoPlugin_v1.0.tar.gz
Then go to Tools -> Plugins, under Downloaded tab, choose Add plugins. Navigate to where you saved the .nbm file and click OK.
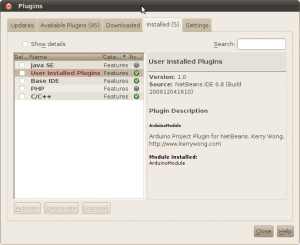
After installing the plugin, the plugin option screen should look like the following:
How to use
To create an Arduino project, go to project new and choose Arduino project template.
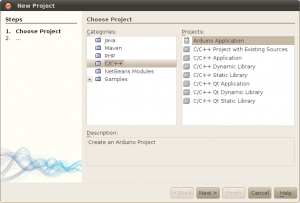
After the project is created, you should see two files (main.pde and makefile) under Source Files folder, and main.pde contains the code skeleton:
#define __AVR_ATmega328P__

#include <binary.h>
#include <HardwareSerial.h>
#include <pins_arduino.h>
#include <WConstants.h>
#include <wiring.h>
#include <wiring_private.h>
#include <WProgram.h>
#include <EEPROM/EEPROM.h>

void setup()
{

}

void loop()
{

}
| [adsense] |
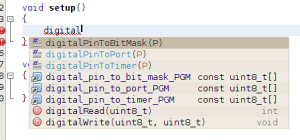
I tried to make the code structure look as close to that in Arduino IDE as possible, but for the code auto completion to work, some extra includes are needed. Also, note that I have included the MCU definition (#define __AVR_ATmega328P__) to get the the MCU specific intellisense work. You can change this to the type of MCU you are targeting.
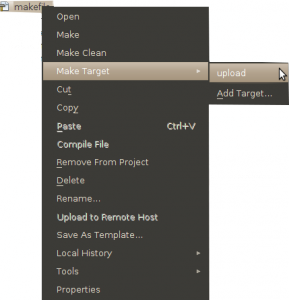
To build your project, right click on the makefile and choose make or make clean. If your build is successful, you should see a HEX file built in the applet directory within your project root. And you can use the Make Target -> upload option to upload the HEX file onto the Arduino board.
Behind the scene
The Arduino plugin for NetBeans is developed as a NetBeans project sample module. The makefile is adapted from the make file used within the Arduino environment and is discussed here.
I had put some additional comments in places where you might need to edit for it to work with your projects. For instance, your project may link to more modules than the ones listed below.
#Note that if your program has dependencies other than those
#already listed below, you will need to add them accordingly.
C_MODULES = \
$(ARDUINO)/wiring_pulse.c \
$(ARDUINO)/wiring_analog.c \
$(ARDUINO)/pins_arduino.c \
$(ARDUINO)/wiring.c \
$(ARDUINO)/wiring_digital.c \
$(ARDUINO)/WInterrupts.c \
$(ARDUINO)/wiring_shift.c \CXX_MODULES = \
$(ARDUINO)/Tone.cpp \
$(ARDUINO)/main.cpp \
$(ARDUINO)/WMath.cpp \
$(ARDUINO)/Print.cpp \
$(ARDUINO)/HardwareSerial.cpp \
$(ARDUINO_LIB)/EEPROM/EEPROM.cpp \
Also, I followed the technique used in the Arduino IDE to assemble the sketch with other necessary information and the main program at compile time (see the portion of the makefile below) to keep main.pde as simple as possible. The only issue is that compilation errors are referenced against the assembled source code rather than the code you write in main.pde. I had originally thought about putting all the necessary code in main.pde and thus would not require code merge at compile time, but it would make the code less compatible with the Arduino IDE environment.
#applet_files: main.pde
applet/$(TARGET).cpp: main.pde
# Here is the “preprocessing”.
# It creates a .cpp file based with the same name as the .pde file.
# On top of the new .cpp file comes the WProgram.h header.
# and prototypes for setup() and Loop()
# Then the .cpp file will be compiled. Errors during compile will
# refer to this new, automatically generated, file.
# Not the original .pde file you actually edit…
test -d applet || mkdir applet
echo ‘#include “WProgram.h”‘ > applet/$(TARGET).cpp
echo ‘void setup();’ >> applet/$(TARGET).cpp
echo ‘void loop();’ >> applet/$(TARGET).cpp
cat main.pde >> applet/$(TARGET).cpp
Future Enhancement
Currently, there is no serial port monitor integrated with the NetBeans environment. So if your code uses the Serial class (i.e. Serial.println()), you will have to use the serial monitor bundled with Arduino. This should not be a big issue though, since even in Arduino, you have to click on the Serial Monitor every time after you upload the code to use it any way. I am planning on integrating the serial monitor with NetBeans in the future but it would probably take some time.
Download
Arduino plugin for NetBeans: ArduinoPlugin_v1.0.tar.gz
Update 12/17/2011
I have updated the plugin and the makefile for Arduino 1.0. These updates can be found here.

